
Last updated on August 20th, 2025

Trying to figure out where and how to start SEO on a new website can be a daunting task. Fear not! I have done this on numerous websites and will give you a breakdown of how to start with SEO on a brand-new website. Keep in mind this step-by-step SEO for new website guide can also work for websites that are already up and running with some minor tweaks. Let’s get started!
Your guide to starting step-by-step SEO for new websites
Here’s an overview of what we’ll cover in this guide to starting step-by-step SEO for new websites. It’s like a cheat sheet on how to start with SEO for new websites:
- Step 1: Understand your business and its offerings.
- Step 2: Conduct keyword research.
- Step 3: Build a tentative sitemap.
- Step 4: Build out the foundation pages.
- Step 5: Optimize the pages.
- Step 6: Get the technical foundation in order.
- Step 7: Push your website live.
- Step 8: Formulate a blog strategy and stick to it.
- BONUS: Leverage other social media channels.
Before we dive into the actual SEO steps for a new website, let’s simplify what is SEO and how we can think about approaching it.
Search Engine Optimization Basics: What is SEO?
Search engine optimization (SEO) is the process of increasing the visibility of a website or web page to users of a search engine such as Google or Bing. SEO targets unpaid traffic rather than direct traffic or paid traffic.
When approaching SEO I like to think of it as a house.

First, you can’t build a good house without a solid foundation. This is where we want to make sure all the technical items are in order, such as:
- Site and page load speed.
- URL structure.
- Robots.txt.
- Internal linking structure.
- XML sitemaps.
NOTE: Check out some common technical SEO issues I see so you can stay ahead of them!
Next, we can build strong walls on top of that strong foundation. This is where we build out the core pages of the website targeting the right keywords. Keep in mind that the core pages you have will depend on your business, but the following are some common examples.
- Home
- About
- Services/products
- Case studies/portfolio
- Resources/blog
- Contact
Finally, we can build the roof, and we’ll continue building the roof into the stratosphere.
- Blog content
- Off-page items such as backlinking
Now, let’s dive into building the house…
Step 1: Start SEO by understanding your business and its offerings
You might be surprised how often I come across client websites that don’t have pages for the services and/or products they offer. A lot of people working in this industry also miss this crucial SEO step, for new websites and old ones alike. Basically, if you want to show up on Google or other search engines, you have to have content that targets that keyword and related keywords.
This is why we have this at step one. Ask yourself what it is that you do. What services do you offer? What products do you sell? What do you want people to know about your business? What makes your company different from the competition?
You don’t have to do anything too in-depth here, but make a list and take some notes, as they’ll come into play in the next steps.
Step 2: Conduct keyword research
Now that you have a deeper understanding of what might need to be on your website, it’s time to start conducting keyword research to get your new website SEO project rolling. Moving forward, I’m going to use an example niche and location: personal injury attorney in Los Angeles. However, this applies to any niche.
Create a keyword list
Before you even start the research, let’s create a list to house them. You can use a paid tool like Semrush’s keyword manager or do it manually by creating a spreadsheet including the following columns:
- Keyword
- Tag or category (used for organization and assigning pages)
- Traffic
- Keyword difficulty
- Cost-per-click
Research the competition
This may sound strange, but some of your greatest allies when doing SEO for new websites are your top competitors—they just don’t know it.
Whether you’re doing keyword research to start building out your website, getting ideas for blog posts, or understanding the competitive landscape, checking the competition and seeing what the top performers are doing is always your best baseline and a great starting point. After all, how do you learn to do something? You learn from those who do it well, and then you get better than them.
Going back to our example of a personal injury attorney in Los Angeles, this is what we see on the SERPs
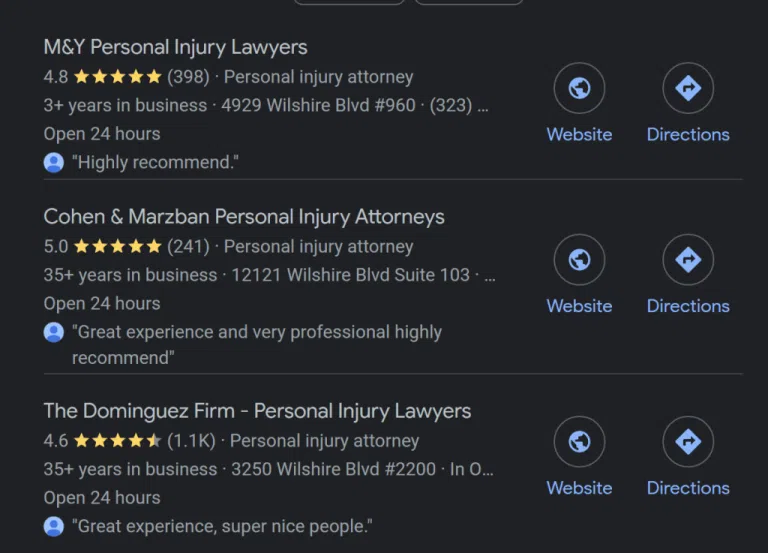
This first image—because it’s a localized search for Los Angeles—gives us results in what is called the local map pack.
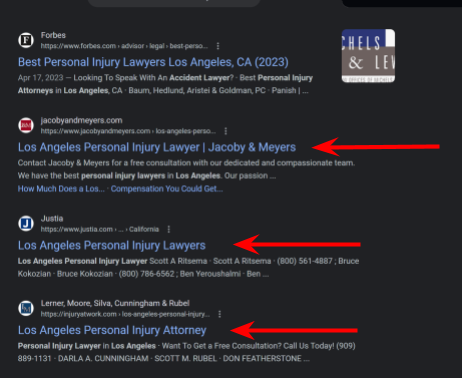
This second image is the top four results. I don’t have an arrow to the first result because it’s a Forbes page listing a number of different lawyers. While it might not be bad to look at to get on that list, that’s for a different post, and they aren’t really our direct competition.
Take note of the top 3-5 websites. There are three main things we want to do with this information:
- Check the competition’s site structure and the pages they have. Look at all the main pages they have in their header menu. This will give you an idea of what pages you should have on your website. Note all the pages that are relevant to what you offer
- Take these websites and pages, put them into a tool like Ahrefs or Semrush, and analyze the keywords these pages are ranking for. Start adding them to your list and categorize or tag them with the corresponding page you think they will belong to.
- E.g., the keyword “vehicle accident lawyer” can be tagged with “vehicle accident” so you know it’s a potential page you want to create and a keyword you want to target
- Take note of what these top-performing pages have on them in terms of content. Ask yourself these questions:
- How long is the content?
- Do they have rich media (photos, videos, infographics, etc.)?
- What sort of calls to action are they using?
- What is their keyword density?
Once you’ve done some thorough research on the competition’s websites and pulled keywords into your list, continue doing some manual research to fill in any gaps.
You can use a tool like Semrush’s keyword magic tool or Ahrefs keyword explorer to look for variations of the service keywords you have in mind and the keywords you pulled from the competition. You might see better opportunities as well as supporting keywords to each of the pages.
NOTE: Each page will have a main target keyword, but you’ll want to have variations and supporting keywords on the page to give it more relevance and avoid keyword stuffing. Also, pages will almost always rank for more than just one keyword.
Step 3: Build a tentative sitemap
Now that we have the keyword research completed, we have an idea of the pages we want and the keywords they’ll target. We can now organize it into a sitemap so we can start to put together the structure of our website. Remember the foundation of our house?
There are a number of ways a sitemap can be done, and it’s a matter of preference. I prefer to build a simple layout using Google Sheets. You can get a copy of this simple sitemap template here.
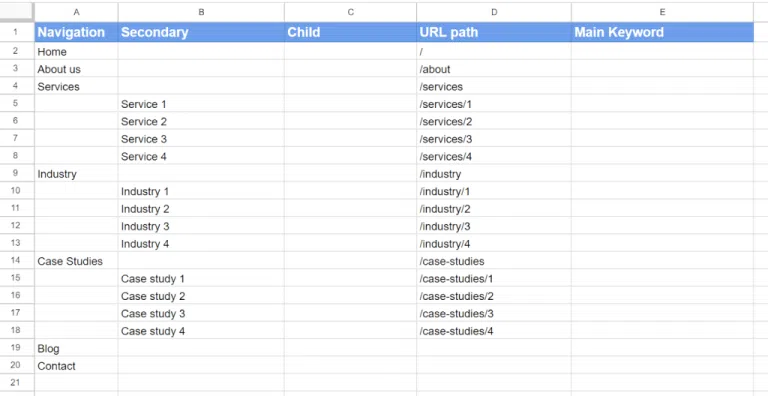
Let’s go through each of these columns and what they mean.
Navigation
This is pretty much where you map out your header menu with your top-level pages.
Secondary
This can be thought of as your submenu items: specific services, product categories, specific case studies or resources, etc.
Child
This one isn’t always necessary, but these would be pages that live under the submenu pages
URL path
This is where we can lay out the URL structure of our site. Here are some tips:
- Keep the URLs shorter.
- Have the main keyword in your URL slug.
- Subpages should live under their parent page folders.
- E.g., Service X should be under Services, so the URL would be xyz.com/services/service-x.
Main keyword
Map the main keyword you chose to each of their respective pages.
Step 4: Build out the foundation pages
At this point, we have the structure of our foundation laid out, we know the core pages to be built, and we know what keywords each of those pages will be targeting. Get ready because the conceptualization phase of starting SEO is complete and it’s now time to build!
Write the content for each of these pages—yeah, it takes some time. You can use AI tools to help get you a decent headstart, but don’t forget to give your content a human touch!
When you are writing content for these pages and building them, make sure to reference some of the top websites and see what they have on their pages—and, of course, do it better.
Step 5: Optimize your SEO content to boost performance
Okay, we now have all the content on the pages, hopefully in a nice layout and design. We have to make sure each page is optimized. Here are the main on-page SEO items to take into consideration:
- Include the target keyword in the title tag and meta description.
- Include the target keyword and its variations in the heading tags.
- Interlink between the pages with the appropriate keyword anchor text.
- Build URL structure for the page.
- Evaluate keyword density for the main keyword. Make sure not to keyword stuff! Try and fall somewhere between 2%-5% in keyword density.
- Add relevant schema markup to the pages.
- Add rich media to the pages where applicable.
- Link to other authoritative websites and content (not direct competitors) to back up any data or points where applicable
- Add succinct but descriptive alt text to any images, and try to get the main keyword for the page in there if possible—don’t force it, though!
Step 6: Get the technical foundation in order
We started putting pieces of the foundation of our SEO house together in the previous step and we will continue here. Here are the main items we want to focus on.
- Google Analytics: Once you have your domain and content management system (CMS) set up, you’ll want to add your GA4 tracking code to your website. Here’s how to set up GA4 on a website.
- Google Search Console (GSC): This can be done once you push the website live. GSC will provide data on indexing and performance in Google’s search engines. Here is how to set up GSC.
- XML Sitemaps: When you have all your pages up and ready you will want to generate an XML sitemap. Once you push the site live, make sure to submit your XML sitemap to GSC.
- Robots.txt: Set up your robots.txt file. Simply put, this tells search engines which pages to crawl and which ones to ignore.
- Site speed: It’s very important to test your pages to make sure they have a fast loading time. This will need to be done once the pages are live so you can put them through a tool like Google’s PageSpeed Insights. Google and other search engines are continuing to prioritize page speed and experience, which can have a large effect on ranking if your pages are slow.
- If you’re building on WordPress, you can use free or paid plugins to help with page speed.
- Don’t forget to compress, resize, and use web-friendly image formats such as WebP before uploading them to your site!
- URL structure: We tackled this during Step 3 when creating our tentative sitemap, but just double-check that your URL structure is sound.
Step 7: Push your website live
It’s finally time to publish your website! Make sure to:
- Set up Google Analytics and that it’s tracking properly.
- Set up Google Search Console.
- Submit your XML sitemap(s) to GSC.
Step 8: Formulate an SEO ranking strategy for your blog and stick to it
It’s time to build the roof of our house with a content strategy.
NOTE: The most successful websites never stop building the roof!
I won’t go into how to do so here, but you can check out our post on how to build a content strategy for more in-depth information. Here are some extra tips to take with you:
- Start a keyword list as we did in Step 2.
- Get blog ideas and keywords from your competitors—see what they’re writing and if you can write a better more in-depth post.
- Check SERPs with keywords you might want to target and look in the “people also ask” results for more ideas.
- Create pillar content and clusters around the pillars for additional, more-detailed posts that support it.
- Use a reverse funnel strategy. This is basically working your way up from your sales pages (i.e. service/product landing pages) with blog posts that hit different intent levels in a potential customer\’s journey to buying a product or service
- Make sure you go through and cover all necessary on-page SEO optimizations
- Be consistent! We don’t want to publish four blog posts in a week and then no posts for two months. Try to post at least once a week.
- Focus on providing valuable information for the reader. They should come away feeling they learned something. Provide a unique take on something backed by your expertise. We write blogs for people, not for search engines.
BONUS: Leverage other social media channels
Having a solid website is key; however, it isn’t everything. People get their information and learn about businesses, services, and products more than ever from social media. If you build out relevant social media channels along with your website, you just may be unstoppable! Here are some tips:
- Understand what social media platforms are most relevant to your audience.
- Post regularly on those channels with useful and engaging content.
- Link from your social media channels back to your website and corresponding pages related to the post. Also, link from your website to your social media channels
- Recycle content! You can turn a blog post into a YouTube video/short, TikTok, Pinterest post, Instagram post, etc., or vice versa. Work smarter, not harder!
That’s a wrap on new website Search Engine Optimization basics!
That’s it. You now know how to do SEO for a new website. Follow these SEO best practices for your website and you will already be ahead of so many others. Starting SEO and maintaining it is a grind, but it has great payoffs down the line if you stick to it. And, of course, if you ever need any help, feel free to reach out to our friendly folks here at Ranq!